The Best of the Joy of Painting with Bob Ross
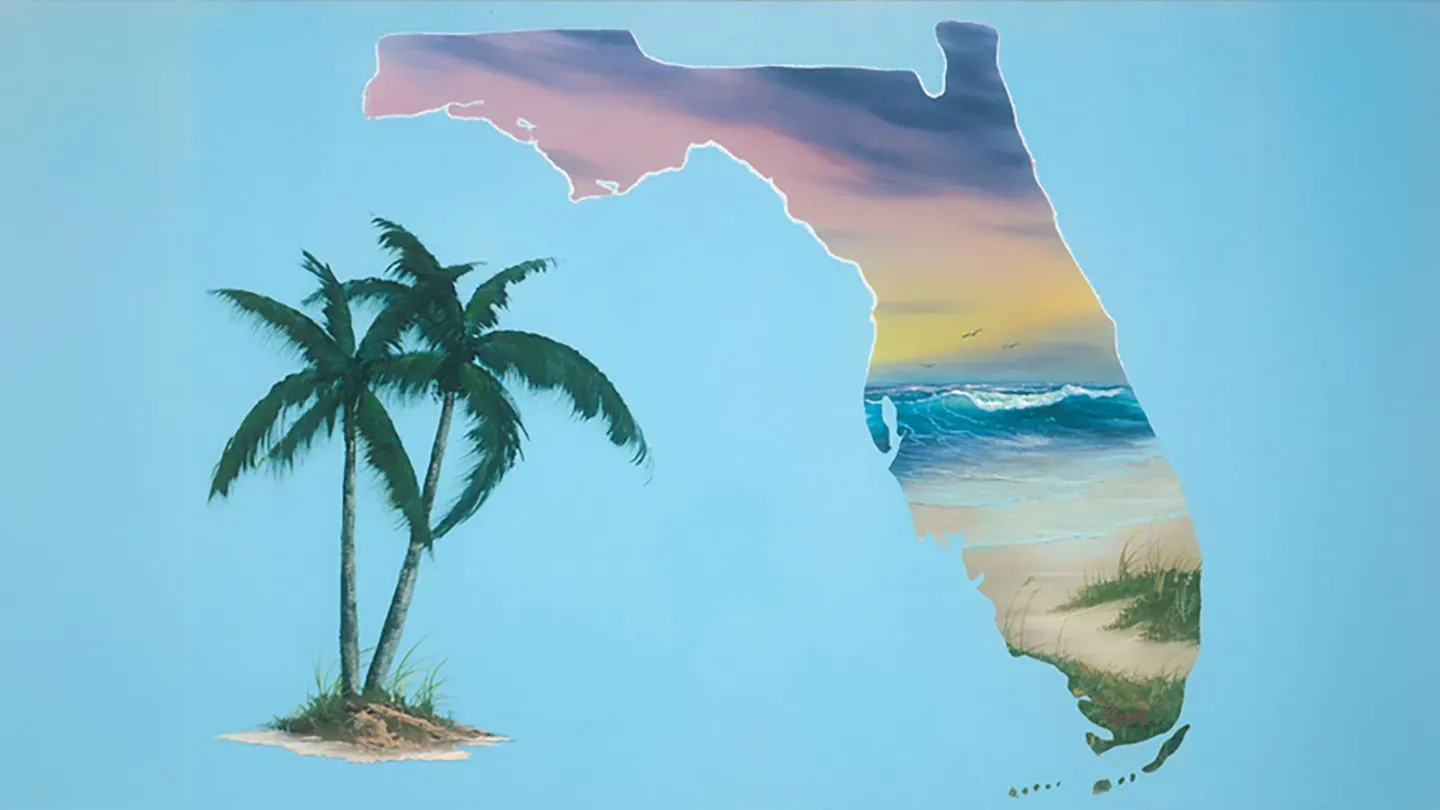
Florida's Glory
Season 41 Episode 4105 | 27m 19sVideo has Closed Captions
Bob Ross creates a painting within the shape of the state of Florida.
Bob Ross creates a clever painting -- lovely beach and palm trees within the shape of the state of Florida.
Distributed nationally by American Public Television
The Best of the Joy of Painting with Bob Ross
Florida's Glory
Season 41 Episode 4105 | 27m 19sVideo has Closed Captions
Bob Ross creates a clever painting -- lovely beach and palm trees within the shape of the state of Florida.
How to Watch The Best of the Joy of Painting with Bob Ross
The Best of the Joy of Painting with Bob Ross is available to stream on pbs.org and the free PBS App, available on iPhone, Apple TV, Android TV, Android smartphones, Amazon Fire TV, Amazon Fire Tablet, Roku, Samsung Smart TV, and Vizio.
Providing Support for PBS.org
Learn Moreabout PBS online sponsorship[Music] Hi, welcome back.
Certainly glad you could join us today.
I thought today we'd do something different since this is the last show of the twenty first series.
And today, let's start out and have them run all the colors across the screen that you need to paint along with me.
While they're doing that, [laughs] come on up here because this is crazy.
Let me show you what I've done.
I've taken a little contact paper cutout today, just adhesive-backed paper and I've cut a little map of Florida.
Since I live in Florida, I thought today we'd do Florida.
The top of it I've covered with Liquid White and the bottom here I'm, I'm covering with just Liquid Clear, and I've put a little color right in here.
Now the one thing that I did do before I put the contact paper on is I sprayed the whole canvas a light baby blue color, and you can spray it any color you want it.
And I just picked Florida today since that's where I live.
You could actually do this for any state that you live in.
In fact we're, maybe we'll have a series that each week we'll do a different state, and we'll show you how to do it, and something that goes along with that state.
But today, let's start with that one.
I'm going to start out today with the least little touch of Yellow Ochre, just a very small amount on the old two inch brush.
And let's go right up in here and let's just do a beautiful little Florida scene that should make you happy.
There we are.
Just put a little bit of that yellow right in there and let it blend upward.
And I'll go right up here, take a little bit of Alizarin Crimson and put that across there, and just sort of let them blend together.
Maybe we'll let this pinkish color, oh maybe we'll let it go way on up from here.
Like so.
Now when you're doing this at home, to get a design, and you could use any design that you want, just take and project it onto a piece of contact paper and trace it and cut it out.
Very easy.
I use something like an exacto knife or something like that, or a pair of scissors, whatever.
I use an exacto knife, but a pair of scissors would work, and you can cut just about any design that the mind can imagine.
All right.
We'll just let that blend right down a little bit into that yellowish color.
Something like so.
We'll do a little sunset thing today.
Okay, take a little bit of lavender here.
We'll use a little Phthalo Blue and Alizarin Crimson, proportionately much more crimson than blue.
Maybe right here at the water line we'll put a little bit of lavender color.
Something about like that.
Don't want to lose all that yellow, but want a little lavender right at the water.
Now I have Liquid Clear from here down, and then in here I've just put a little lavender in here, a little Phthalo Blue and lavender.
There we are.
We'll make a very simple little seascape in here, because to me, that sort of represents Florida.
Everybody comes to Florida to enjoy the ocean.
We'll shake this old brush [laughs] and just beat the devil out of it.
All right.
Let's take a little fan brush.
Let's make us some more of that lavender color.
That's a nice color.
We'll use some Alizarin Crimson and Phthalo Blue, a little Phthalo Blue, right there, like so.
Something like that.
And that should be good for what we're looking for.
And let's go right up in here and maybe, maybe we have some little clouds that live right up in here.
And we can make those just, just by, now I'm exaggerating, but making a shape like that sort of.
And just sort of decide where your little clouds live here.
Maybe they go all the way out and get lighter and lighter out in here.
There.
However.
You decide how they go.
Just want to show you how to do it, then turn you loose on the world.
There.
Hope you've enjoyed this series.
With the completion of this one, let's see, two hundred, two hundred and seventy three half hour shows now.
Whew, good gracious, getting to where my math doesn't go high enough to figure it out.
And if you've enjoyed the shows and would like to see them again or you'd like to see the ones maybe that you've missed, give your station a call.
Let them know that you'd like to see them, because they're available to them.
There.
Maybe there's a little floater right along here.
Okay, maybe, shoot maybe it comes right on out here, we don't know.
Just sort of let these things happen.
Right in there, maybe there's even a little streaky one right in like that.
Okay, back to our big brush.
Be sure it's good and dry and very gently, down here we'll just blend that sort of across, literally pull that paint, since it's wet, you can move it.
Up in here, follow the basic angles and very lightly, just blend that out.
And you can blend it to any degree of softness that you want or you can leave little things in it.
Sometimes, sometimes, I go back, add a little more of the blue to the same lavender color, but a little more of the blue, to the blue side, load the old fan brush full of color.
Let's go back up here.
And maybe here and there, put the indication of something that's a little darker, and it'll make it look like it's a little closer to us.
Because as you know, in a landscape, or a seascape, things should get darker as they come toward us.
There.
Now, with our clean dry brush, we'll just blend that in, and that way, it'll look like there's several layers of clouds up there in this beautiful little sky.
All right.
Okay, that's about all we need for a little sky.
That'll give us a very nice one, very effective.
Okay.
Now then, we can come down here and begin deciding where our water lives.
Let me find a little fan brush.
There it is.
Use the little number three fan brush here.
And I'm going to do this one basically like I do a large seascape.
I'm going to take the brush and sort of decide where my major wave will be.
[Bob makes "tchoo" sound] Up like this, and then maybe, it'll sort of drop over a little bit, and go right through there.
Somewhere in there.
Maybe our little floater will be in, right along in there.
There it is.
Let me find this.
Take a liner brush, put a little, a little bit of the Titanium White on it, and I'm just going to take this and sort of roll it, turn it, as you're going let it turn, and just begin figuring out basically where our little breaker's going to be.
That's all we're looking for at this point.
We'll keep adding color and stuff in there.
I just want to know where it's going to be at this point.
I'm going to reach up in here and begin blending a little of that out so there's a light area underneath it.
There.
There we go.
See, that way, we have an idea where our breaker's going to be.
Now then.
We can come right in here, grab the top, and sort of lift it over.
This is going to be a tiny little wave way back in the distance.
Way back there.
There.
All right.
Good.
Back to our liner brush, take a little of the Titanium White, and I'm going to start back in here, figuring out where the horizon is and all the little things that are happening.
There.
See all those little doers?
Very easy to do.
I want these to sort of float right on back almost into nothing.
Okay.
And we can take some that's really bright and highlight a few of them.
There.
Okay.
Now then.
Now then, back to my little liner brush.
Let's do that one more time.
That'll give us, that'll give us right along where the breaker is here.
And we can pull a little of that color right over the top, bring it all together.
Something like so.
Now then, take a little of the Phthalo Blue and a little crimson, but mostly to the blue side this time.
Put a little dark area right in, underneath.
Need a little dark area underneath.
Something like that.
Maybe it comes out to about there.
Now then, I'm going to go into a little touch of the Dark Sienna.
It's time we started getting into a little land area.
Right there, just a little bit of that.
Maybe, even a little bit of the Van Dyke Brown but not much Van Dyke yet.
Just begin laying in where our little beach is going to be in here.
Dark Sienna, a little Van Dyke, just bring them together.
Maybe we'll just cover up the whole bottom of that.
That looks nice.
There.
And I'm putting a pretty dark color in here to start with, so when we put lighter colors on it it'll show.
You need that dark in order for the light to show.
There.
Okay.
Now.
Have to begin deciding if we have water up here on the shore, and if so, where it's at.
So we'll take a little white, I'm going to mix the least, least, least little touch of Phthalo Blue with it but least little touch.
Least little touch.
Cut off a tiny, little bit more, little roll of paint, right out on the edge of the knife, and maybe in our world, right along in here, we have a little water that's playing right along up here on the beach.
[Bob makes "shooo" sound] There, see there?
Now, take a clean fan brush and very gently grab that.
And I'm just going to blend it back, but it should go straight back so your water looks flat.
Otherwise your water just won't look flat.
Okay.
There.
A little bit in there.
Now we have to begin thinking about the shape of the wave that's coming out through there.
And I'm going to go back to my little brush, my little liner brush, put a little paint thinner, a little Phthalo Blue, a little white, and now we can become forming some of these little dudes.
Just creating the illusion of all kinds of little, little ripples and little, little things that are happening in the water, little foamy masses.
There.
Okay.
Maybe we'll brighten that up a little bit right in there, just a little, make that really stand out.
Okay.
Now take a little bit more of that, flip that right over.
Okay, now.
And this is one of the simplest, easiest ways of doing a little seascape.
A little bit more of that white with the least, least little touch of the Phthalo Blue in it.
Least little touch.
Touch here, maybe there's another little water line right out through here somewhere.
And once again, with a clean dry fan brush, has no paint on it, just grab it and pull.
Just pull it back.
Like that.
There.
And you can touch the base of that, pull it down and go lightly across and it'll make it look like the water's wet the sand here.
Just like the sand's wetness.
Put our edge back in there.
There.
See?
Now we have a little wet area in there.
Okay.
A little white, a little Dark Sienna, and let's begin putting in some lighter color sand maybe right in here, and it's not so wet, color's a little bit lighter.
So we'll use white, a little, little touch of the Dark Sienna and let it sneak right up in there.
There.
Okay.
Now.
I'm going to take the least little bit of the lavender color, and right under here, see if you have a steady hand, under this line I'm going to put a little line of dark color, or darker than the white.
That'll make it look like there's depth to it.
And we can take some of these little doers, pull them back, just make all kinds of little things in there.
There.
And there's a little dark color back in there here and there just to make an indication of the space between the waves.
All right.
Good.
As I say, if you've missed any of our shows, give your station a call and let them know that you'd like to see them because they are available to them without any problem, and we'd like for you to have the opportunity to see them all if you would like to.
Okay.
Okay.
I want this right in here, a little lighter, so I'll just add a little bit more white.
Oh yeah, that's nice.
And maybe there's a happy little sand dune that lives here.
So for that, let's just take white, a little Dark Sienna, going to begin deciding where it lives.
Maybe it lives, yep, you're right, right there.
Right there.
[Bob makes "swooo" sound] We'll just throw in a little bit of color, something like so, and blend it down, very lightly.
There.
Okay.
Now then, let's have some fun.
Let's take a little of the Prussian Blue, a little Sap Green, mix them together and make a dark, dark green.
Maybe we'll put a little black into it.
Ooh, that's nice.
Very dark green though.
And maybe, maybe, maybe, yep, there's some little weeds and bushes and all those things that live up here on our sand dunes and they just sort of travel right down the edge there.
Something like that.
Okay.
And we can take our brush, grab just the base of this a little bit, just barely touching it, and let a little of it come into that.
There.
Now then.
Back to our liner brush, we'll take a little, a little of that greenish color with paint thinner, and we can begin lifting up some little weeds and sticks and, you know, little sea oatie things, whatever.
There.
There we go.
Okay.
Take that, I want to go right into a little bit of the Yellow Ochre and do the same thing again, so we sort of highlight some of those.
There.
You know if you're interested in, and I know we're not, but if you're ever interested in selling paintings, these kind of little paintings will really sell well in, especially in areas where you have a lot of tourists, like Florida or Alaska.
Places like that.
But you could do this for any state and every state has something that it's well known for, and you can, you can feature that in there.
So try it for your state or just do any one that you want.
Now maybe, [laughs] tell you what, maybe, maybe there's another little dune comes right across here.
That'll push everything back and we can see the little grassy things in there.
Just using the number three fan brush here and pushing upward, really pushing upward.
Take a little, little tiny bit of the Cad Yellow, a little bit of the Yellow Ochre, and just put a little highlight on it, don't want a great deal, just a little highlight.
A little more of the Cad Yellow.
There, a little sparkler here and there.
Okay.
And we'll go back to our little liner brush, do the same thing again.
Take a little bit of the, that green color we made, lift it up, and if I remember that was just a little Sap Green, a little black, a little Prussian Blue.
There.
And just flip them little things up, give them a little flip.
[Bob makes "psoom" sound] And if you want to make it look like little sea oats, you can just grab the end of it and put little doers on the end out there.
Of course, you know in Florida, sea oats are getting sort of rare.
I think everybody's sort of picked them til now they don't even let you get close to them hardly.
Everybody seems to want to take them home.
All right, a little bit of the Yellow Ochre, a little Yellow Ochre, and we'll come back and sort of highlight a little of those, wherever.
There.
Just a few of them.
Okay.
Shoot, no Florida scene would be complete without a little m bird in it.
Everybody puts little, little seabirds in there, so for that, take a little paint thinner.
I'll use a little black, a little black, and take one side through a little bit of white, and we can go up in here and [Bob makes "pshoo, pshoo" sounds] there.
Now we've got a little, little m bird, that's what I call them, because they're very simple to make, it's like making little m's.
Give him a friend, and maybe way back there there's a third one.
Think that one got a broke wing.
[laughs] Somebody shot him on the way over.
[Bob makes "pshoom" sound] Now then, moment of truth.
Let's take this off and see what we have.
See if it worked out all right.
When we remove the contact paper though, isn't that gorgeous?
And as I say, you could do this with any state that you wanted to.
It doesn't have to be Florida.
It just so happens, as I say, that I'm living in Florida right now, so I thought I would do a, a tribute to the state that I'm living in.
But when I lived in Alaska, I used to do these with the state of Alaska.
In fact, sometimes I would even cut the state of Alaska out of wood and paint little scenes from Alaska on it.
We would sell them to the tourists.
And uh as I say we're not interested in making money, but if you are, it's one of the neatest little ways of doing some fantastic little paintings.
And you can get carried away with this sometime.
Get carried away.
We'll take a little brown, Dark Sienna, Van Dyke, we'll mix them together.
And you can even do such crazy things, see because you painted all this in blue, it sort of looks like water to me, so maybe, in our world, [Bob makes "swoo" sound] you brave?
Maybe right along there, right along there, we'll put just a happy little tree.
[Bob makes "swoo" sound] Let's give him a little friend.
Maybe his little friend lives right here.
[Bob makes "swoo" sound] There.
We'll just have a couple of them little rascals.
All right.
Looks like a big v there for victory.
I'm going to take paint thinner, a lot of paint thinner, and go into the black with the same old brush.
But I want this paint to be very thin.
Very, very thin.
And let's come up here and maybe we'll make us, what looks like an old palm tree.
This is very thin paint, you touch, go around like that, then you can grab it and just give it a little pull.
See?
And it'll make all those little doers.
All right.
Okay, let's put in several here, wherever we think they might be.
Up in here there's some.
There's another one, there's one.
However.
And you can just grab them and give them a little pull.
But the paint has to be very thin, especially on this dry canvas.
If it's not really thin, it will not do this.
And you have to also be a little careful because if it's too thin, it'll run, and ruin your whole day.
Drip right off the canvas.
There.
This is one of the simplest ways of making a little palm tree.
There we are.
Okay.
Tell you what, this other one over here is bald.
We'll put some, put some hair on him too.
That reminds me, I had a letter from a lady here a while back.
She told me if I was going to wear a wig, I could at least get one that matched my beard.
And I sent her an answer back and told her if I'd paid for this wig, I'd, I'd taken it back to the store now and asked for a refund because all the hair is falling out of it.
[laughs] That's for sure.
Old age is catching up with me.
There we are.
Okay.
Maybe another one over here, but you could put a whole palm forest out here if you wanted to.
Just whatever.
Let's take, let's take a knife, a little bit of, we'll just use a little grey and white, since that's handy.
I just want to put the indication here of a little highlight on this.
Something like that.
Don't want to overdo it, don't want to overdo it.
Okay.
Firm up this side a little.
But isn't that neat?
Now.
We can come right back in here.
Let's take a little bit of the Dark Sienna.
We've got to give this thing something to sit on.
We'll give it a little land right there.
Something like so.
Take a little white, a little Dark Sienna, mix them together so it looks sort of like little beach sand there, [Bob makes "tchoo" sound] and we'll just let that fade right on off into nothing.
And we'll take our little fan brush that has the green on it, and we'll pop in a happy little bush or two right around his little foots.
Don't want him left out.
Looks like he's just sort of sitting out here in the water, all by himself.
Take our liner brush, a little bit of that dark green color, and let's just pop in a few little things like so, wherever.
Maybe the wind's blowing sort of a little bit in that direction.
But just lift those.
Like that.
There.
As I say, this is the last show of the twenty first series.
And it's always sad for me to have to finish a show.
But we'll be back.
We're already under production for the next series, we've already got some ideas started and Annette and I are getting ready to do that, so, so we'll be back.
As long as you'll watch us, [laughs] we'll keep on making the shows.
Now we can take a little touch more of this, just bring the bottom of it together, like that.
I hope you've enjoyed this one.
This is so different than anything we've done before, but it will certainly give you some ideas on how you can do some fantastic scenes yourself.
Give it a try, and I'd love to see some photographs of what you're doing.
Because I think if you try this, you'll absolutely fall in love with it.
Got just a minute here left, I'm going to take some of that dark green color on the fan brush, and I'm just going to highlight a few of these little palm fronds up here, just with a little green, just enough to make them stand out a little.
There.
And I think with that, we're going to call this old painting finished and we're going to bring this series to an end.
From all of us here at the station, we'd like to wish you Happy Painting, God bless, and I look forward to seeing you in the next series.
[announcer] To order Bob Ross' 256 page book with 60 Joy of Painting projects or his Four Seasons DVD set, call 1-800-Bob-Ross or visit BobRoss.com [music] [music]


Distributed nationally by American Public Television